

前言
ChatGPT好用,这个谁都知道,对于生产力有很大的提升,于是早在ChatGPT刚开放API的时候就在公司内部部署了使用UI,3.5一直用的好好的,可是后来GPT4出来了,问题也就来了。
大家都知道GPT4更好用,效果更好,我们跟大家说明了下尽量只选用3.5的,不要用4的。
我们:大家尽量用3.5,一样好使
同事:好的好的
然后才到月中,就到达限额了。
果然,不做强制,总会有人不顾及团队,那没办法,只能做点手脚了。
人的嘴最不可信:)
我们换了一套UI,使用的是ChatGPT-Next-Web(https://github.com/ChatGPTNextWeb/ChatGPT-Next-Web), 里面可以在启动的时候限制是否使用GPT4,很NICE.
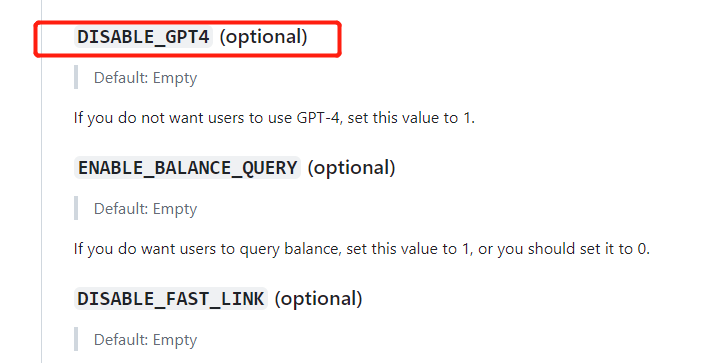
我们部署了两个站点: gpt.xxx.com和gpt4.xxx.com,前者使用了这个DISABLE_GPT4的参数,大家无法再选用GPT4的模型了,部署命令如下:
docker run -d --restart=always -p 3001:3000 \
   -e OPENAI_API_KEY="sk-xxxxxxxxxxxxxxx" \
   -e CODE="my_code" \
   -e DISABLE_GPT4=1 \
   yidadaa/chatgpt-next-web
大家一直只知道gpt.xxx.com,还不知道gpt4这个站点,只是得到通知无法使用GPT4了,我们将gpt4告知部分有真实业务需求的同事,并告知不要外传。
没有意外的话,出现意外了:) , 没多久,公司又不知道有多少同事在使用这个GPT4的站点了, OpenAI账户的信用卡限额马上告急。
因为这个Web没有单独账号的权限管理的,所以我们打算自己接入权限
那就做一个权限验证功能
我想到有两种做权限的方式:
- 1、直接修改源码,添加账户认证
- 2、使用
Nginx的auth_request来限制,这样不用修改源码
我选用了2,因为这样就不用看源码了,能节省不少时间。
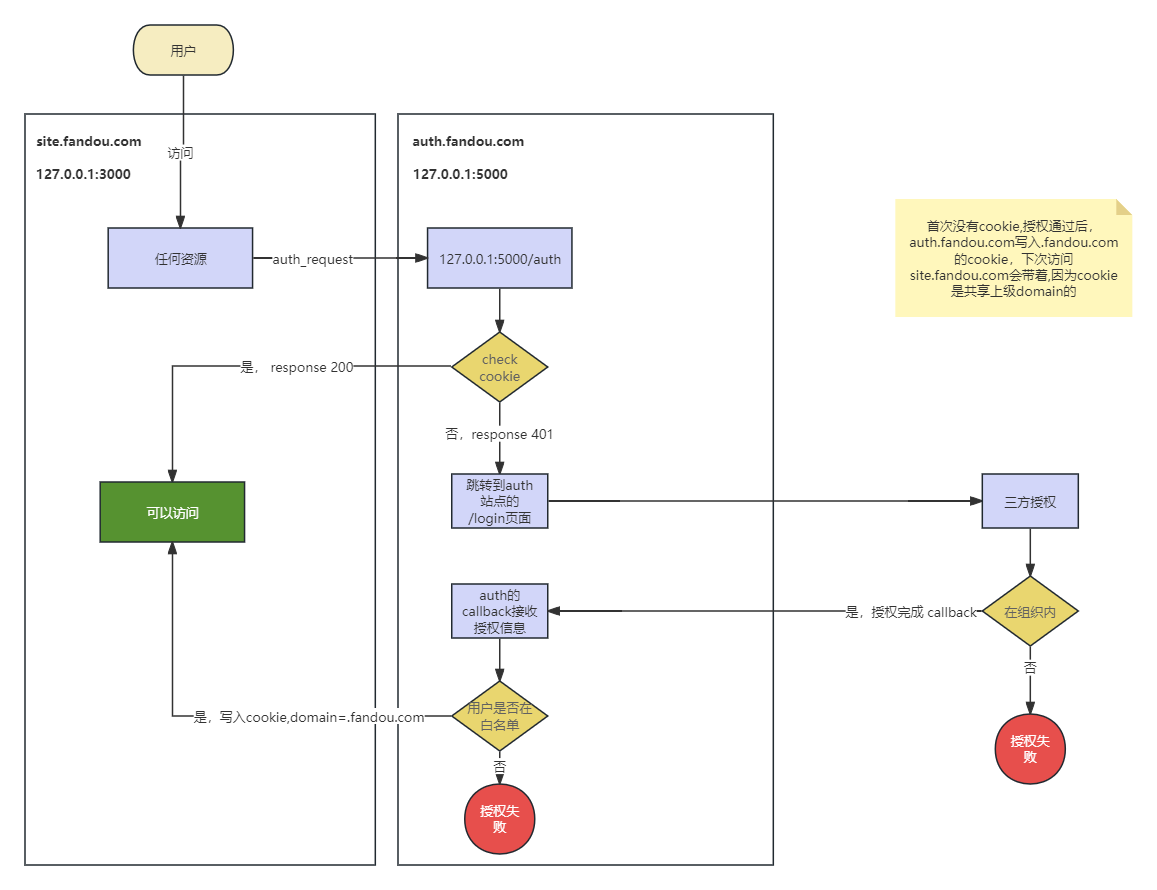
具体如何做呢?这个auth_request是什么?我以前有一篇文章提到过这个用法:如何无法修改网站代码的前提下给它添加授权保护?
如果不愿意看那篇文章,这里有一些它的简短描述:Nginx 的 auth_request 模块,可以让 请求进入到你的服务前,先去另一个服务中进行验证。
流程大致如下:
Coding
已有的部署文件修改
首先,修改这个GPT4站点的部署Nginx部署文件,大致如下:
server {
   listen   0.0.0.0:80;
   server_name  gpt4.xxx.net;

   client_max_body_size 1G;

   location / {
       auth_request /auth;
     # Use IPv4 upstream address instead of DNS name to avoid attempts by nginx to use IPv6 DNS lookup
       proxy_pass http://0.0.0.0:3000/;
       proxy_set_header Host $host;
       proxy_set_header X-Real-IP $remote_addr;
       proxy_set_header X-Forwarded-For $proxy_add_x_forwarded_for;
     }

    location = /auth {
        internal;
        proxy_pass http://127.0.0.1:5000;

        proxy_pass_request_body     off;
        proxy_set_header Cookie $http_cookie;

        proxy_set_header        Content-Length "";
        proxy_set_header X-Original-URI $request_uri;
        proxy_set_header X-Real-IP $remote_addr;
        proxy_set_header X-Forwarded-For $proxy_add_x_forwarded_for;
        proxy_set_header X-Forwarded-Proto $scheme;
    }
    error_page 401 = @error401;
    location @error401 {
        return 302 https://gptauth.xxx.net/login;
    }

}
几个细节说明:
1、auth_request /auth; 表示每个请求进来前,都先去/auth下验证一下
2、 /auth使用internal;导向到 本地5000端口的服务上,也就是这个5000端口的服务才是做校验的
location = /auth {
        internal;
        proxy_pass http://127.0.0.1:5000;
        #...
}
3、当验证服务器返回401的时候,会302重定向到一个登录页面
    error_page 401 = @error401;
    location @error401 {
        return 302 https://gptauth.xxx.net/login;
    }
制作权限认证的站点
服务代码
就是上面的https://gptauth.xxx.net这个,它主要有2个接口:
1、/auth,权限认证接口,gpt4.xxx.net会先到这个gptauth.xxx.net/auth接口来做认证,认证是看有没有GAU这个Cookie且值为1
2、/login,登录页面,如果没权限,这里需要做登录,后面我这边会接入Google账号认证,因为公司每个人都有Google账号,下面代码每次校验我都从本地读取文件whitelist.txt,因为这个调用频率很低,这样就不用每次新增人员都要重新部署了
3、/callback,这个是给Google账号授权做的回调
代码如下:
from flask import Flask, request,redirect, send_file, make_response

app = Flask(__name__)

from google.oauth2 import id_token
from google.auth.transport import requests

COOKIE_NAME = 'GAU'

def process_jwt_token(jwt_token, client_id):
    try:
        token_info = id_token.verify_oauth2_token(jwt_token, requests.Request(), client_id)

        print(token_info)
        email = token_info['email']
        print('email in token is ' + email)
        return email
    except ValueError as error:
        print('err :', error)


@app.route('/auth', methods=["GET"])
def auth():
    cookies = request.cookies
    print(f'cookies is:{cookies}')
    cookie_value = request.cookies.get(COOKIE_NAME)
    response = make_response('')
    if cookie_value == '1':
        response.status_code = 200
    else:
        response.status_code = 401

    return response

@app.route('/login', methods=["GET"])
def login():
    return send_file("./index.html", mimetype="text/html")


@app.route('/callback', methods=["POST"])
def callback():

    credential = request.form['credential']
    cur_email = process_jwt_token(credential, "xxx-yyy.apps.googleusercontent.com")
    ALLOWED_EMAILS = []
    with open('/app/whitelist.txt', 'r') as file:
        for line in file:
            email = line.strip()
            ALLOWED_EMAILS.append(email)
    found = any(cur_email.lower() == each.lower() for each in ALLOWED_EMAILS)
    if found:
        print('found it\n')
        return send_file("./set_cookie.html", mimetype="text/html")
    else:
        print('not found \n')
        return send_file("./ban.html", mimetype="text/html")

if __name__ == '__main__':
    app.debug = True
    app.run(host='0.0.0.0', port=5000)
登录界面
登录界面包含Google账号认证,如下:
<html>

<head>
    <meta charset="UTF-8">
    <style>
        body {
            display: flex;
            justify-content: center;
            align-items: center;
            height: 100vh;
            margin: 0;
        }

        .centered-content {
            text-align: center;
        }
    </style>
</head>

<body>
    <div class="centered-content">
        <h1>访问GPT4,请先登录</h1>

        <div id="g_id_onload" data-client_id="xxx-yyy.apps.googleusercontent.com"
            data-context="signin" data-ux_mode="popup" data-login_uri="https://gptauth.xxx.net/callback"
            data-auto_prompt="false">
        </div>

        <!-- data-callback="onSignIn" -->
        <div class="g_id_signin" data-type="standard" data-shape="rectangular" data-theme="outline"
            data-text="signin_with" data-size="large" data-logo_alignment="left">
        </div>
    </div>


    <script src="https://accounts.google.com/gsi/client" async></script>
    <script>

        window.onSignIn = (googleUser) => {
            console.log(googleUser.toString())
            console.log(googleUser.credential)
            for (let key in googleUser) {
                if (googleUser.hasOwnProperty(key)) {
                    console.log(key, googleUser[key]);
                }
            }
        }
    </script>
</body>

</html>
设置cookie的界面
当我们认证成功后,需要设置Cookie,这个很关键,并且需要设置Domain为xxx.net的,这样gpt4.xxx.net和gptauth.xxx.net就能同时访问到这个Cookie,后者可以据此进行认证。
<!DOCTYPE html>
<html>
<head>
    <meta charset="utf-8">
<style>
body {
      margin: 0;
      padding: 0;
      display: flex;
      height: 100vh;
flex-direction:column;
    }

    .images {
      display: flex;
      flex: 10;
    }

    .msg {
        display: flex;
        flex: 1;
      justify-content: center;
      align-items: center;
      color:crimson;
    }
    .button {
      display: flex;
      justify-content: center;
      align-items: center;
      flex: 2;
      background-color: #f2f2f2;
    }

    .image {
      flex: 1;
      background-repeat: no-repeat;
      background-size: cover;
      background-position: center;
    }

    .image1 {
      background-image: url("/static/guide1.png");
    }

    .image2 {
      background-image: url("/static/guide2.png");
    }

    .button button {
      padding: 10px 20px;
      font-size: 18px;
      background-color: #007bff;
      color: #fff;
      border: none;
      border-radius: 5px;
    }
</style>
    <script>

var currentDate = new Date();

// 计算过期日期(当前日期 + 7天)
var expirationDate = new Date(currentDate.getTime() + (7 * 24 * 60 * 60 * 1000));

// 将过期日期格式化为 cookie 的 Expires 属性所需的字符串格式
var expires = "expires=" + expirationDate.toUTCString();
        document.cookie = "GAU=1; expires="+expires +";domain=.xxx.net";

function go(){

        window.location.href = "https://gpt4.xxx.net";
}
</script>
</head>
<body>
<div class="msg">
您已通过验证,如果您是第一次使用GPT4,请按照下面的图片示例,进行基础设置。
</div>

<div class="images">
<div class="image image1"></div>
<div class="image image2"></div>
</div>

<div class="button">
<button onclick="go()">
了解了,点我跳转
</button>
</div>
</body>
</html>
这里其实可以直接跳转的,只不过还贴了两张引导图,教大家如何首次设置。
部署这个gptauth站
这个没什么好说的,就是基础的反代
server {
   listen   0.0.0.0:80;
   server_name  gptauth.xxx.net;

   client_max_body_size 1G;

   location / {
     # Use IPv4 upstream address instead of DNS name to avoid attempts by nginx to use IPv6 DNS lookup
       proxy_pass http://0.0.0.0:5000/;
       proxy_set_header Host $host;
       proxy_set_header X-Real-IP $remote_addr;
       proxy_set_header X-Forwarded-For $proxy_add_x_forwarded_for;
     }

}
结束语
当我们把这一套部署好之后,OpenAI账号的信用卡余额就再也不担心了,所以说人的嘴都不可信,还是代码可靠。
当你需要给一个已有的站点添加权限认证的时候,不妨考虑使用Nginx的auth_request功能。
评论区